How to create a solid and secure Content Security Policy
This step-by-step guide will help you understand and set up a solid Content Security Policy for your website.

What is a Content Security Policy (CSP)?
A Content Security Policy is an extra layer of website protection that's easy to implement and monitor. You can use it to detect and mitigate the likes of Cross-Site Scripting (XSS) and data injection attacks that could lead to data or cookie theft, a change in the appearance of your site (defacement), or the distribution of malicious scripts and software.
Why use it, and how does it work?
The main reason for publishing a CSP is to protect your visitors from malicious code being executed on your website. Setting up a CSP—which you do by allowlisting specific origins, sources, nonces, and hashes—allows you to specify what content is allowed to be loaded. This way, you can prevent external scripts from downloading and executing. This dramatically limits the attack vector that malicious scripts can use to harm your visitors as well as your brand.
A short example explaining how CSP works:
- A user visits your website
- The browser fetches the website’s headers (where the CSP is specified)
- The browser parses the CSP and remembers which sources are allowed to be loaded.
- The browser now starts to load additional resources defined in your source code, like Google Analytics, fonts, images, CSS, inline scripts, etc.
- Each resource is cross-referenced to the page’s CSP, and if a source is not specified, the resource is blocked.
- If specified, a violation report is sent from the browser to a reporting endpoint like URIports.
Adoption
Based on the (February 2020) data from Scott Helme's Crawler.Ninja, just over 5% of the Alexa top 1 million websites publish a Content Security Policy, so there is room for improvement. It will make the internet a safer place for all of us. So let's get to work and find out all about implementation. 😊
A complete walk-through on how to implement a solid CSP
In this walk-through, we cover all the steps you need to build your CSP from the ground up and test it without breaking your site in the process. We recommend you work in Google Chrome because of the extensive console and detailed messages on CSP violations. While testing, it's also advisable to disable plugins because they can trigger violations that you cannot and should not attempt to fix.
Step 1: Start with a basic CSP header
There are two CSP headers: one enforces violations; the other only report them. Of course, you can use both headers simultaneously, but let's start with the report-only header, so you don't break your site, and you can see for yourself what violations are triggered when you visit your site with a basic policy.
Try our JavaScript CSP Report Handler
Alright, let's get started. First, add the following response header to your site:
Content-Security-Policy-Report-Only: default-src 'self'; font-src 'self'; img-src 'self'; script-src 'self'; style-src 'self'Don't know how to add headers? Check our short guide.
You now have a report-only policy that tells the browser:
default-src: if resources are not defined in the other sections, use this policyfont-src: defines what fonts may be loadedimg-src: defines what images may be loadedscript-src: defines what scripts may be loadedstyle-src: defines what styles/css may be loaded
The first argument (e.g. default-src) is called a directive. All the directives in the example have 'self' as a trusted source. This tells the browser to only load resources that are hosted on the same (sub)domain.
Step 2: Start monitoring in the browser and check violations
Start Google Chrome, go to your website, and press F12 to open the developer tools and the console. When the console is open, refresh the page, and any violations that have been triggered will appear on the screen.

Step 3: Check and fix the violations
You'll probably trigger quite a few violations in the console. Most violations you see happen because your policy isn't set up correctly yet—that's the next step. You can fix violations in two ways: remove the code that triggers them or allowlist the source in your CSP. Let's start with allowlisting.
Whitelist external sources
There are multiple ways to allowlist a source; here are a few examples.
Example 1
In this example, we allowlist our own (sub)domain, and we allowlist all the content that comes from a domain we trust (*.example.com); the domain may be used for anything like images, scripts, media, etc. because it's defined in the default-src directive.
Content-Security-Policy-Report-Only: default-src 'self' *.example.comExample 2
It's possible to be stricter in your policy. In this example, we allowlist our domain as the default (self), the domain images.com for images, and the (sub)domain myscripts.otherwebsite.com for scripts. Images and scripts loaded from other domains violate our policy and will not be loaded when we enforce our policy.
Content-Security-Policy-Report-Only: default-src 'self'; img-src images.com; script-src: myscripts.otherwebsite.comExample 3
When defining sources in your CSP, we recommend that you're as strict as possible. For example, when you allowlist a javascript file that's hosted on cdnjs.cloudflare.com, for example, do not allowlist the complete domain, but specify the exact file or directory you would like to allowlist. Allowlisting the complete domain opens up your site for other possibly malicious scripts hosted on that domain.
Refer to the exact external resource:
Content-Security-Policy-Report-Only: default-src 'self'; script-src: https://cdnjs.cloudflare.com/ajax/libs/vue/2.6.11/vue.min.jsOr if that isn't practical, at least try to be as strict as possible, like referring to a specific location:
Content-Security-Policy-Report-Only: default-src 'self'; script-src: https://cdnjs.cloudflare.com/ajax/libs/vue/
The more specifically you define your sources, the better you protect your site visitors.
Whitelist inline sources
A CSP can allowlist the usage of inline scripts and styles, but we don't recommend it mainly because it will significantly increase the risk of a malicious script injecting code. There are few options for allowlisting inline code.
Option 1: The best solution: Don't use inline code at all
Stop using inline code. Move code to external files. This makes it easier to maintain a CSP and keep the website safe for visitors. It's also absolutely recommended, even though it's possibly the most challenging option to choose if your site uses inline scripts and styles.
Option 2: Use a hash
If, for some reason, inline code is necessary, you can allowlist an inline code block with a hash or a nonce. A hash is the easiest. You need to calculate the hash for a specific inline code block and allowlist that hash in your CSP.
Hash example
You have an inline script running on the website like this:
<script>alert("Hello World!");</script>Your CSP will block this script from running, and in the developer console, you will see that this inline script triggered a violation. To allow this inline script, check the message in the console. It contains the sha256 hash that you can include in your policy. The message in the developer console looks something like this:
[Report Only] Refused to execute inline script because it violates the following Content Security Policy directive: "script-src 'self'". Either the 'unsafe-inline' keyword, a hash ('sha256-vtOwtCfiL2B+TrRWnLTdfTIr7KTaqohZywH93jHLSGw='), or a nonce ('nonce-...') is required to enable inline execution.The console message confirms that the hash 'sha256-vtOwtCfiL2B+TrRWnLTdfTIr7KTaqohZywH93jHLSGw=' can be used. Copy the hash and update your CSP like this:
Content-Security-Policy-Report-Only: default-src 'self'; script-src 'self' 'sha256-vtOwtCfiL2B+TrRWnLTdfTIr7KTaqohZywH93jHLSGw=';Now the inline code block is allowlisted, and the violation is fixed. Remember that the hash is generated based on the content of the inline script. Therefore, if you change the inline script, the hash will be different, and the browser will again trigger a violation.
Option 3: Use a nonce
Sometimes, a hash is unwanted or impractical because the inline code block might contain dynamic data, causing the hash to change. The alternative is to use a nonce. A nonce is a generated random string that allows you to allowlist a complete code block regardless of its content. A vital security aspect when using a nonce is that you need to generate a new nonce each time a page is loaded and make sure the nonce is not predictable in any way. An attacker who can guess the nonce will still be able to run inline code. Place the generated nonce in your CSP header dynamically and insert the same nonce dynamically in the page source that contains the inline code blocks.
Here is an example of a nonce in use. This is the generated CSP header:
Content-Security-Policy-Report-Only: default-src 'self'; script-src 'self' 'nonce-VVJJcG9ydHMuY29tIGlzIHRoZSBiZXN0';Now add the same nonce to your script-tag:
<script nonce="VVJJcG9ydHMuY29tIGlzIHRoZSBiZXN0">...</script>
And remember: don't use a static nonce; otherwise, nonces are nonsense. Pun intended.
Option 4: Allow inline code blocks (not recommended!)
You can use one option to enable inline code blocks, but please only use this as a last resort because by enabling this, you open up the possibility for code injection, and the main reason for using a CSP is to block malicious code injection in the first place. So don't use this option!
To allow unsafe inline scripts and styles, add the value 'unsafe-inline' in your CSP. In this example, we have enabled the use of inline scripts and inline styles.
Content-Security-Policy-Report-Only: default-src 'self'; script-src 'self' 'unsafe-inline'; style-src 'self' 'unsafe-inline';Are you already feeling dirty for enabling unsafe-inline? You should be.
Alright, all violations fixed? Let's take the next step.
Step 4: Enable real-time reporting
After you have resolved all violations and the developer console is no longer displaying them, you can enable the URIports reporting tool to start monitoring any violations that might occur when other visitors use your site.
Get a URIports account
If you do not have a URIports account yet, sign up for a 30-day trial account and log in. Locate your report endpoint URL (like example.uriports.com) in the top right portion of your dashboard in your account.
Update the headers
You need to update your current CSP header and add an extra header to enable reporting. Add the directive "report-uri" and specify your report endpoint. Replace "example" with your own URIports account subdomain.
Content-Security-Policy-Report-Only: default-src 'self'; font-src 'self'; img-src 'self'; script-src 'self'; style-src 'self'; report-uri https://example.uriports.com/reports/report; report-to defaultTo enable the CSP ‘report-to’ directive, you need to add a header to specify an endpoint for the Reporting API:
Report-To: {"group":"default","max_age":10886400,"endpoints":[{"url":"https://example.uriports.com/reports"}],"include_subdomains":true}After you have published the headers, you will start receiving reports in your URIports account from visitors that trigger violations.
Step 5: Monitor and check the received reports
In your URIports account, all received CSP reports are bundled, prioritized, and enriched to give you as much insight as possible into the violations that were triggered on the website.
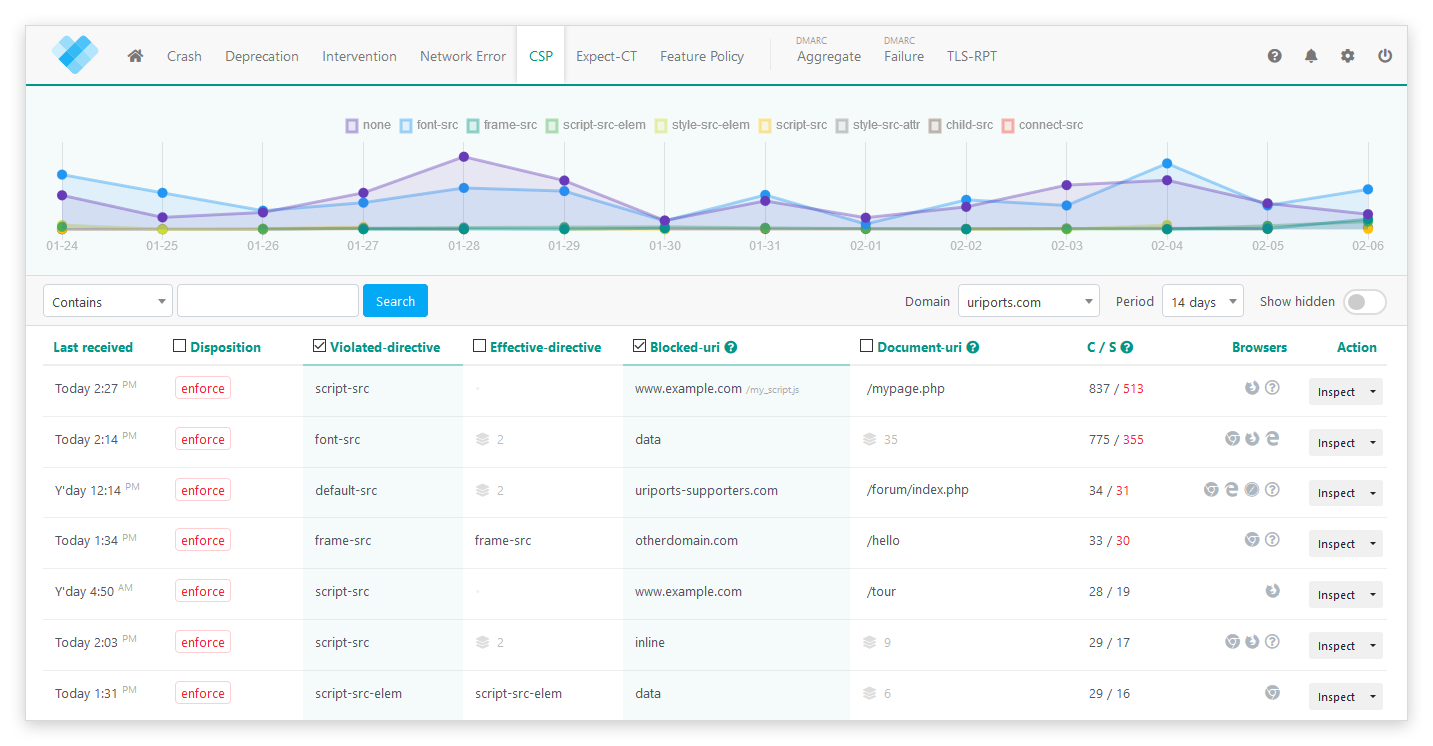
The CSP violations are sorted by importance. Violations being triggered by multiple sources (unique website visitors) are the ones that probably require your attention. You can spot these violations by the red number on the right in the "C / S" column.
Inspect a report
Click the "Inspect" button on the right to inspect a group of CSP violations. The inspector will give you an overview of the different browsers that triggered the violations, where the violation happened, and which directive was violated. All individual reports are also shown. To allowlist the violation, click the "View or allow source" button. This will open the CSP advisor, which will suggest a possible solution to avoid the violation in the future. Suggestions are based on the reported CSP by the browser. Be sure to verify the policy before you implement it.
Hiding the violation
When you have resolved a violation, you can hide the reports by clicking the small arrow on the right of the "Inspect" button and choosing the "Hide" option. This will help you clean up your view so you can focus on the rest. If the violation does happen again, the new reports will appear once more in the list.
Step 6: Enforce your CSP policy
When you're confident that your CSP is set up correctly, you can enforce your policy. When your policy is enforced, the browser will report violations and stop sources from being loaded and executed, thus making the website a safer place. 👍
To enforce your policy, change the header key from Content-Security-Policy-Report-Only to Content-Security-Policy.
So the header:
Content-Security-Policy-Report-Only: ...Becomes:
Content-Security-Policy: ...
That's it! Well done!
Once your CSP is enforced, consider taking it further with Trusted Types, a browser API that enforces safe DOM manipulation at the sink level. Read our guide on CSP Trusted Types.
Step 7: Create rules in URIports for unactionable violations
In your URIports account, you have the option to create ignore and block rules for violations that you cannot fix or violations that you want to ignore. Please read our blog to find out more about creating rules.
Final thoughts
We hope this guide was helpful for understanding and implementing a Content Security Policy. By combining it with URIports, you can make it even more valuable, allowing you to monitor, analyze, and fix violations. A correct and strict CSP will create a safer website and protect your visitors.
Looking to go further? Once your CSP is enforced, consider adding Trusted Types, a browser API that enforces safe DOM manipulation at the sink level. Read our guide on CSP Trusted Types.
And, speaking on behalf of all surfers on the web, I'd like to say thank you for helping to create a safer internet for all of us.