Getting Started with Email Monitoring
URIports has full support for DMARC Aggregate, DMARC Failure, and TLS-RPT reports to monitor email channels. To enable these report types, you will have to make some changes to the domain DNS records. This guide will walk you through the steps to get started and optimize your email security.
Before changing your DNS TXT records, sign up for a free URIports trial account. You can try our service for 30 days without any obligations or entering payment details.
Step 1 - Add domains
Start by adding a domain for which you want to receive reports. Log in to your URIports account and click on the user icon at the top right of your screen. Then click Settings.
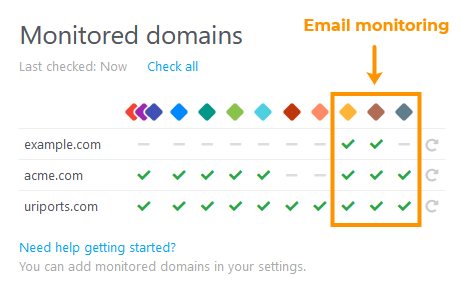
Add the domains you want to monitor to the "Monitored Domains" section on the settings page.
Step 2 - Update DNS records
If you haven't implemented SPF or DKIM yet, make sure to set those up first. Sender Policy Framework (SPF) is a security mechanism created to prevent malicious parties from sending emails on your behalf. DomainKeys Identified Mail (DKIM) was created for the same reason. It signs your emails in a way that allows the recipient’s server to check that the sender was really you and whether the message was altered during transmission.
Adding DMARC to your DNS records will give you great insight into the number of (fraudulent) emails that are being sent on your domain's behalf. You can also use DMARC to instruct a receiving server on what to do when both DKIM and SPF fail. For now, we just want the reports (p=none). We do this by adding the following TXT record to your DNS records:
HOST: _dmarc
TYPE: TXT
VALUE:
"v=DMARC1; p=none; rua=mailto:dmarc@account-subdomain.uriports.com; ruf=mailto:dmarc@account-subdomain.uriports.com; fo=1:d:s"
If the domain already has a DMARC record, you can add the URIports endpoint to the rua and ruf elements by adding ",mailto:dmarc@account-subdomain.uriports.com" to each of them:
rua=mailto:first@example.com,mailto:dmarc@account-subdomain.uriports.com;
Most email providers send DMARC reports once a day, so it can take up to 24 hours before you will receive your first DMARC report. Want an instant report? Use our Instant DMARC reports!
Open official DMARC documentation
Step 3 - Check configuration
When you have updated your DNS TXT records, please verify in your URIports account if everything is set up correctly. Log in to your URIports account and check the section "Monitored domains" on your dashboard. Click the "Check all" link and view the results. The domains should have a green check icon.
If there is an exclamation icon, hover over it to view the error message.
Tip! You can also use our DMARC policy test to check if there are syntax errors in your DMARC policy.
Step 4 - Instant test your DMARC setup
When you set up or strengthen your SPF or DKIM configuration, you ultimately want to check that everything is working correctly. DMARC reports are a great way to see how your SPF and DKIM are performing, but unfortunately, these reports are usually only sent once every 24 hours.
Instant DMARC reports let you see your SPF and DKIM performance in seconds. Send an email from your legitimate sources and services (like your email marketing platform) to emailtest@account-subdomain.uriports.com after adding the domain to your URIports account, and we'll convert the SPF and DKIM validation results into a DMARC report for you to analyze right away.
Step 5 - Enable SMTP TLS Reporting
This last step is to enable SMTP TLS Reporting (TLS-RPT). TLS-RPT is a reporting mechanism by which sending systems can share statistics and specific information about potential failures with recipient SMTP MTA (STARTTLS, DANE TLSA, and MTA-STS). You can then use this information to both detect potential attacks and diagnose unintentional misconfigurations. You need to set up a DANE TLSA DNS record and/or deploy an MTA-STS policy for this to work.
Add the following TXT record to your DNS:
HOST: _smtp._tls
TYPE: TXT
VALUE: "v=TLSRPTv1; rua=mailto:tlsrpt@account-subdomain.uriports.com"
That's it!
Well done, and thanks for using URIports for your Email Monitoring.
If you want to learn more about understanding DMARC reports, please read our in-depth guides on DMARC reports and how to analyze them.